Are you looking for a way to migrate your WordPress site and move to a new host or server? Moving your website to a new host can be a stressful experience if you aren’t much familiar with Cpanel and hosting.
We have created a step-by-step guide for you to ease the migration process and help you accomplish the migration without any technical difficulties.
Many people are faced with the need to move to a new host because of limitations with their current provider. But all too often, people rely on experts for migrating their site to a more reliable host due to the fear of making a mistake and damaging the site.
When looking for a new WordPress hosting provider, it’s important to choose carefully. So you don’t have to frequently change your hosting.
Here’s who we recommend:
- For reliable shared hosting, we recommend going with Bluehost. They’re officially recommended by WordPress.org.
- If you’re looking for managed WordPress hosting, then we recommend you check out WP Engine and also Flywheel. They are the best and most well-known hosting provider in the industry.
For migrating a website to a new host, you can hire an expert. But it comes at a cost. You have to pay a large fee for a professional to move your site from one host to another. If you are someone who doesn’t want to have extra expenses and want to try it out yourself then this article is for you.
Let’s go through the steps required to transfer your WordPress website to a new host. But before we get started, please keep in mind that many of the best WordPress hosting companies will actually help you move your site for you without any additional charge.
So if you have just purchased a new hosting plan, first check with your hosting provider to see if they offer free migration. Bluehost is a great hosting provider that does provide free migration within the first 30 days of signup.
Step 1: Backup Your Website Files
The first and the most important step before migrating is to back up every aspect of your site. This should be a part of your general WordPress security and is good practice to keep your website safe.
There are mainly two ways to backup your site –
The faster and easier way is to use WordPress backup plugins that you can use to take a full backup of your site. If you want to use a plugin, one of the best options is UpdraftPlus. This plugin offers tons of powerful backup options for scheduling, backup themes and plugins, reporting, monitoring, multisite support, and many more.
Alternatively, you can also manually backup a WordPress site. To give you a quick summary, manual backups require a file transfer tool (FTP) in order to access your website files. Two of the most popular FTP programs are FileZilla (PC) and Transmit (Mac). After installing you’ll need to use SFTP credential (from your web host account) to connect to your website’s server and download all files under your website’s directory.
The next step is to make a copy of your database. While the backup is underway we can begin the next step.
Step 2: Export the WordPress Database

Exporting the database is a very simple process that requires only a few clicks to complete.
- At first, log in to the cPanel account of your web server and open the phpMyAdmin application.
- From the sidebar select the database that contains your WordPress installation.
- After selecting the database, click on the Export tab on the navigation menu.
The default settings of the Export method – Quick export and the SQL format for the export are sufficient for what we need. Click the Go button and the database export process will begin and a file with the extension (.sql) will be downloaded to your computer.
Once the database export is finished and the FTP transfer of your files is completed, you are ready to move onto the next stage.
Step 3: Create a WordPress Database on Your New Web Host
Before we can begin the migration, we need to set up a new database for the WordPress installation. To begin creating a new database, log in to the cPanel of your new web host.
Here are the steps to create a database:
- Open MySQL Database from the cPanel and create a new database with an appropriate name for your website.
- Create a new MySQL user and add a secured password.
- Add this user account to the new database and grant it All Privileges.
Save the database name, MySQL username, and its password. You will need them soon for the next step.
Step 4: Edit the wp-config.php File
Navigate to the folder on your computer where you have downloaded your website files. In that folder, you will find a file called wp-config.php that controls the connection between WordPress and your database.
Make a copy of this file and store it in another folder on your local computer as a backup. This is necessary for restoring the changes we are about to make if something goes wrong.
Open the original version of the file with a text editor and make the following three changes:
1. Change the Database Name
Locate the following line:
define('DB_NAME', 'new_db_name');
The new_db_name portion of this line will currently be set to the MySQL database name of your old web host. This must be changed to the name of the new database you have just created.
2. Change the Database Username
Below this you will find the line:
define('DB_USER', 'new_db_user');
In this line, you need to change the username of your old host to the new username you have just created.
3. Change the Database User Password
Finally, edit the third line:
define('DB_PASSWORD', 'new_db_pass');
The new_db_pass section of this line must be changed to the new password you created for your MySQL user in the previous step.
Save wp-config.php and close the file.
Step 5: Import Your WordPress Database
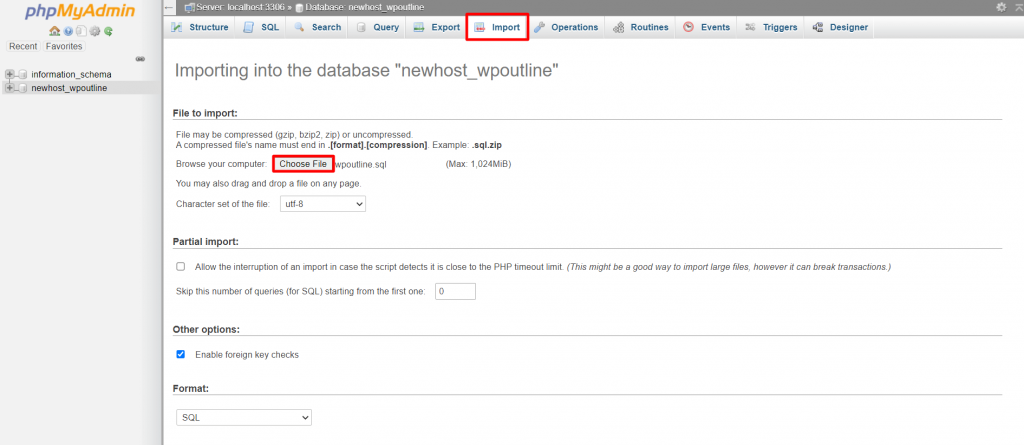
Now it’s time to import our previous database into the new database that we just created. This is a very easy and simple step as follows –
- Open phpMyAdmin from cPanel on your new server and select the newly created database from the list on the sidebar.
- Afterward, select the Import tab from the menu.
- In the File to Import section Choose a File to import. Here you should select the SQL file that you exported previously.
- Turn off the Partial Import check box, you can keep the Enable foreign key checks enabled, and make sure the format is set to SQL, and then click the Go button.
The database import will now begin and the time it takes depends on the size of your database. You should receive a success message when the import has finished successfully.
Step 6: Upload The Website Files To Your New Host
Now that the new database is ready and you’ve reconfigured the wp-config.php file as well. It is time to begin uploading your website’s files to the new server.
At first, connect to your new web host using your FTP program and browse to the folder where your website is going to be held.
If this is the primary, or only site being installed on this server then upload the files to the public_html folder. Otherwise, you can also create a new sub-folder and upload the files there.
Once the upload finishes don’t delete the previous website files from your local computer. You might still need those until the final steps have been completed.
Step 7: Search/Replace Old Domain with the New Domain
If you are moving to a new/different domain then this step is very important for you, otherwise, if it is the same domain then you can skip this step.
One issue that most people always seem to face when moving their site is that they’ve added links to other posts on their site or inserted images directly by pointing to a URL on the server, causing these to break when moved over to a new domain as the URL changes.
If you want to quickly search for any occurrence of your old domain name and replace it with the new name we suggest you take a look at the Search Replace DB script on Github. This will allow you to search for the old domain name and change those to the new domain with great ease.
Just make sure to DELETE the script when you are done due to security reasons and don’t place it in your root domain, instead create a temp folder with a random name to host the script.
By doing a search and replace for the old domain and replacing it with the new domain you’ll also be changing the site_url and home URL values in the database (Changing the Site URL) which will ensure that when you try to log into your new site it doesn’t redirect you over to the old domain.
Step 8: Final Touches
Before you can use the site on your new host there is one last thing that you will need to do and that is changing your domain’s DNS settings. They will be set to point to your old host and you will need to change that to the new server IP address.
It might take up to 48 hours for DNS changes to fully propagate. During this 48 hour timeframe, you should avoid making any changes to your website.
After the DNS change has been successful, you should now be able to access the new web host when you go to your website.
You can now delete the WordPress files and database from your old Web Host. But it is always recommended to have a local backup copy of these files and the database, along with the original wp-config.php file in case you need to roll back the migration.
As you can see, the migration of a WordPress site from one host to another isn’t that difficult when broken down into the above simple steps. All it really requires is to be careful at each step and keep a backup so that you can go back to the original version in case of any problems.
Have you migrated your WordPress website recently? Let us know your experience in the comments section below!
Featured Image Credit: People vector created by stories – www.freepik.com


4 Comments
Simply wish to say your article is as amazing. The clearness in your
post is simply cool and i can assume you are an expert on this subject.
Well with your permission allow me to grab your
feed to keep updated with forthcoming post. Thanks a million and please keep up the enjoyable work.
Hi There, Glad to hear that you have found our article useful. Feel free to checkout some of our other posts.
Excellent! The tutorial was very useful and I was able to migrate my website. Thumbs up for the author.
Hey There, Glad to hear that our guide was helpful for you 🙂