
If you are seeing an allowed memory size exhausted error on your WordPress site then nothing to get overwhelmed with as it is one of the most common errors in WordPress. You can easily fix it by increasing the PHP memory limit in WordPress. In this article, we will show you how to fix WordPress memory exhausted error in three different ways.
What is WordPress Memory Limit Error & Why are You Seeing This Error On Your Site?
Every website requires a certain amount of memory to function properly and this memory is provided by your server or hosting provider. This is why it is always recommended to use a good scaleable hosting provider in the first place so you don’t have to worry about running out of memory limits.
As your site grows larger or you start using more complex plugins and scripts, you may eventually hit your memory limit.
When your WordPress code requires more memory than the default allocated memory, you’ll end up seeing a PHP memory limit like this one –
Fatal error: Allowed memory size of 33554432 bytes exhausted (tried to allocate 2348617 bytes) in /home4/xxx/public_html/wp-includes/plugin.php on line xxxBy default, WordPress automatically tries to increase the PHP memory limit if it is less than 64MB. However, 64MB is often not high enough.
If you are not sure about how much memory is set from your server, you can check it out directly from your website by following the steps mentioned below.
How to Check Your Current PHP Memory Limit
If you’re running WordPress 5.2 or above, you can use the Site Health tool to check what the current PHP memory limit is on your site. In your WordPress dashboard, go to “Tools” → “Site Health” → “Info” and scroll down to the server section. Here you can see that the PHP memory limit that is set on your server.
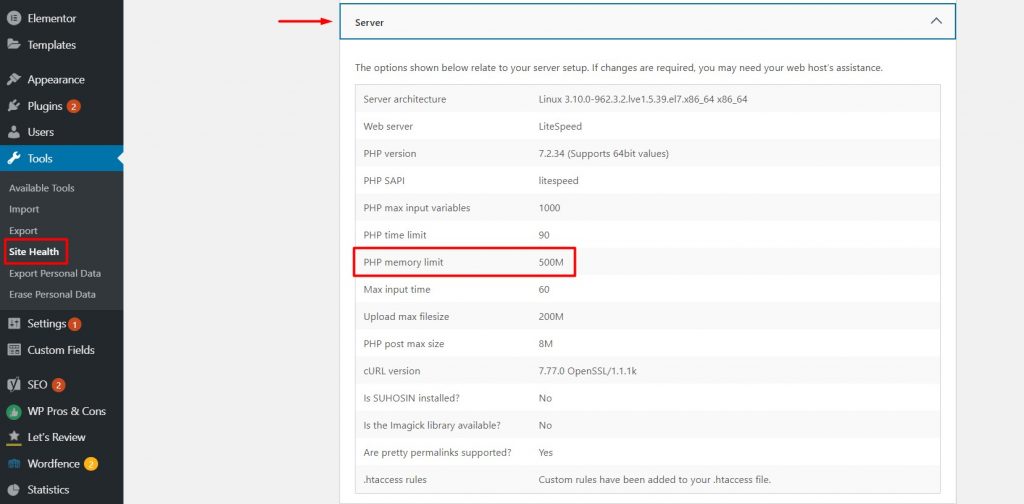
If the amount is low, say below 256M, then we would suggest you increase the amount of memory allocated to your site. There are a few different ways to approach this.
Whichever way you choose, you just have to add a single line of code to the correct file, it’s as simple as that.
Increase PHP Memory Limit in WordPress
Here are the three easy methods –
Option 1: Edit your wp-config.php file
You can increase the PHP memory limit by adding just a line of code in the wp-config.php file on your WordPress site. It is located in your WordPress site’s root folder, and you will need to use an FTP client or file manager in your web hosting cPanel.
You can also access the file directly from your website’s backend using a plugin like File Manager or Advanced File Manager.
Next, you need to paste this code in the wp-config.php file just before the line that says ‘That’s all, stop editing! Happy blogging.’
define( 'WP_MEMORY_LIMIT', '256M' );This code tells WordPress to increase the PHP memory limit to 256MB. If you need higher memory then you can set a value like- 512M, 1024M, etc.
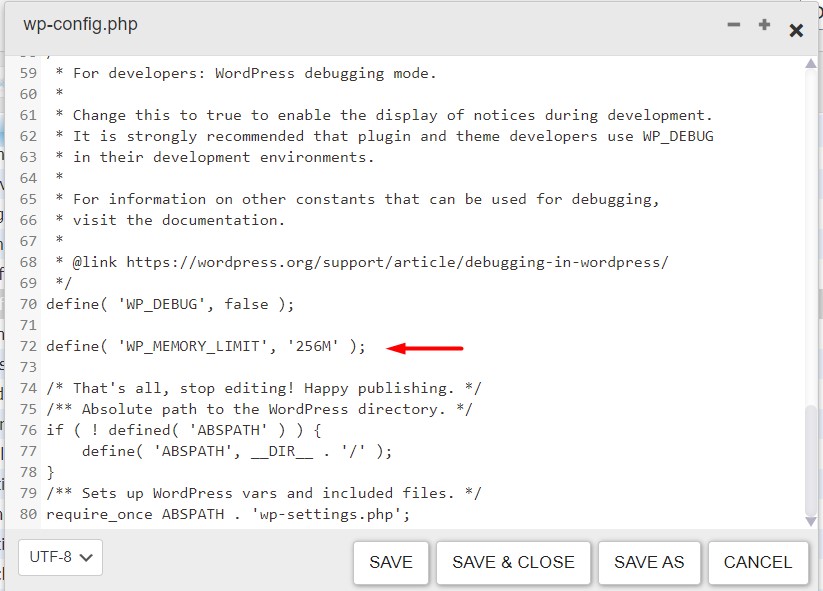
Once you are done, you need to save your changes and upload your wp-config.php file back to your server.
You can now visit your WordPress site and the memory exhausted error should disappear now.
Option 2: Edit your PHP.ini file
If you have access to your PHP.ini file, you can change the following line in PHP.ini
If your line shows 64M change it 256M or a higher value:
memory_limit = 256M ; Option 3: Edit your .htaccess file
If you don’t have access to PHP.ini try adding this code to the .htaccess file:
php_value memory_limit 256MNote: If this solution does not work for you, then this means your web hosting service provider does not allow WordPress to increase the PHP memory limit. You will need to contact your web hosting provider and ask them to increase your PHP memory limit manually.
If you are looking for a good hosting company for your WordPress site then we recommend Kinsta which is a managed WordPress hosting provider which provides highly optimized servers and is reliable for a large website.
That’s all we hope this article helped you solve the WordPress memory exhausted error by increasing the PHP memory limit.
Feel free to leave a comment, if you think this article was helpful for you.


3 Comments
This was super helpful for an issue I’ve battled with for a while now. I have just added the code on the wp-config and it worked like a charm. Thanks so much!
Glad to hear that our guide was helpful for you.
Thank you for the detailed guideline. That solved my issue!